

How To Use Captivate App Instructional Design
Building a fully custom quiz in Adobe Captivate using JavaScript
![]()
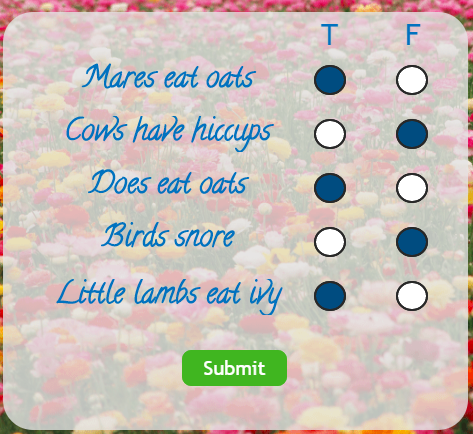
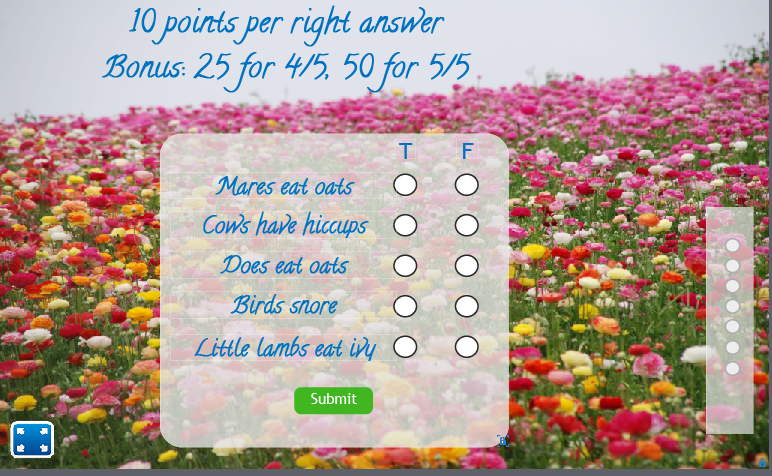
There are probably millions of different quiz-type interactions that we can imagine, of which only a few Captivate can provide as preformed quiz slide types. Captivate tries to provide a sufficiently flexible environment to create unique quiz interactions but it is really easy to get lost in the user interface trying to find just the right combination of functions. In this short article, we'll go through the process of creating a quiz slide with the following characteristics:
- The student gets points for selecting the correct answers, true or false, and that only one of true/false can be active at a time for a given question.
- No scoring until "Submit" is pressed
- Scoring for each answer may be different
- Add +25 points for 4/5 right answers
- Another +25 points for 5/5 right answers
Another, perhaps less o b vious requirement might be that there are no other question types in the module. We'll deal with that as well.
As a bonus, we will introduce an undocumented javascript function that enables you to create a scoring event, similar to clicking a scored checkbox by hand.
Activate the quizzing functions
First, you need to actually create a question slide from one of Captivate's canned types to get the needed quiz functionality and potential reporting. On the toolbar, selecting Quiz -> Question Slide -> (any question type) will create both a question slide and a reporting slide. Since this question slide will be unused, mark it hidden by going to toolbar View -> Hide Slide
The great thing is that hidden questions do not impact the quiz results, so this is an easy solution.
Creating the questions
First, we add regular empty slide after the hidden question slide where we will make our custom quiz.
Question text is simply placed in a smart-shape rectangles.
The true/false buttons is where things get more interesting. For each question, we will create three buttons — the true/false buttons and a third button that will be hidden and will be used to tell Captivate that the answer is correct. All the buttons will look the same, so we make one and then just duplicate them.
Create the button as follows:
- Create a circular "smart shape"
- Select "Use as Button" on the shape's properties tab
- Create a new "state" for the button by opening up the "state view" and adding a "new state." I name this state "selected"
- Format both your new "selected" and the system-provided "Down" state to look the same. then exit the state editor.
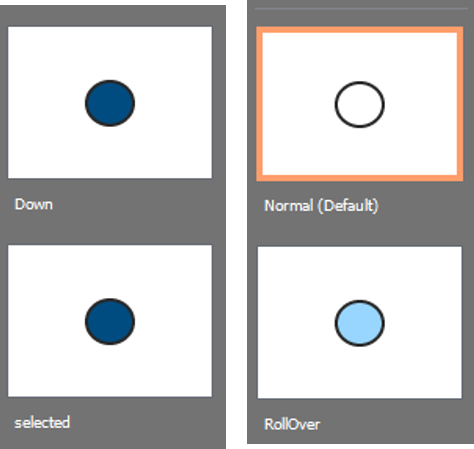
- Change the name of the shape to "Question_T_1" You'll see why in a minute.
This shape will be used for all the buttons in the quiz. We create the extra state "selected" as this is one that we can directly control. Captivate manages the system states, which makes them harder to control. The format of the shape name is important. We will be using a short JavaScript routine to control the toggling function, and with a unique format for the shape names, you can create a general routine that can find these shapes rather than identifying each button individually in the code.
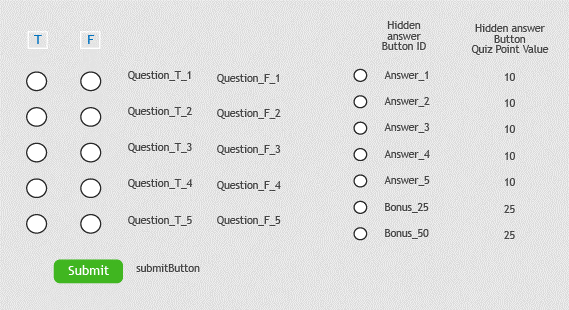
Next, duplicate the shape you just created to fill in each of your questions with the needed true/false buttons, and a third button that we will use to signal that the answer is actually correct. You will see that Captivate automatically changes the number from _1 to _2, _3, _4 as you duplicate the shapes.
We add two more hidden answer buttons for the bonus points.
Next, go through and edit the shape names to have the same name patterns as shown below. The names should look like this:
Dealing with scoring
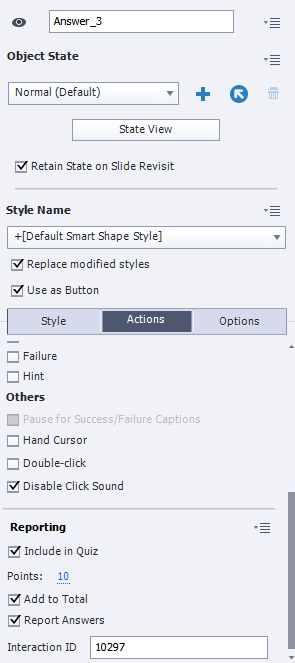
At this point, we need to activate scoring on the answer buttons, which we will use in our JavaScript routine to mark when a correct answer has been selected. Add the following to all of the answer button shape properties tab:
- Actions -> Reporting -> Include in Quiz
- Check the "Add to Total" and "Report answers" marks
- Set the scoring value for the answers. Here you can set arbitrary values for each of the questions and the bonus points
Hiding the Answer Buttons
The answer buttons are not for the user, so we just hide them. You can place them under a picture or under a shape with the same color as the background
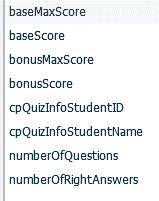
Adding reporting variables
We will be creating a reporting slide after the quiz. As all of the scoring functions are being done in JavaScript, we will need to create variables in Captivate that can be used in JavaScript as well. Here is the list of variables that are needed:
Toggling true/false
I prefer using JavaScript over using advanced actions as I find it more flexible and faster to program, but there are many good reasons not to as well. In this case, the JavaScript enables us to create a very small routine that deals with the toggling problem for all the buttons based on how they are named. Add the following code to your page by using Actions -> On Enter -> Execute JavaScript and adding the following to the script screen:
$('div[id^="Question"].cp-frameset').on("click", manageToggleButtons); function manageToggleButtons(clickedButtonObject) { // get shpe id of the clicked button, this will be "selected"
var targetID = clickedButtonObject.target.id; // create the name of the button you need to toggle to "unselected"
if ( targetID.match(/_T_/) ) {
var invTargetID = targetID.replace(/_T_/, "_F_")
}if ( targetID.match(/_F_/) ) {
invTargetID = targetID.replace(/_F_/, "_T_")
}// captivate undocumented function to change state of object
cp.changeState(targetID, "selected");
cp.changeState(invTargetID, "Normal");
}
As an overall explanation of what this does, first we find all shapes that have an ID that starts with "Question" and hook on a function to run when these shapes are clicked. Then we change the shape state to "selected" and the state of the other related shape to "Normal". We will use the "selected" state to test if the user got the right answer.
Submit
The submit button performs the heavy lifting for checking if the answers are correct and relaying that information to Captivate to pass the score on to the LMS. We create a shape to be the button, then mark it to Use as Button in the properties.
To get the needed functionality, the submit button will call a javascript function we define. This is done under
Properties -> Action -> Execute Javascript
function quizSubmit() { // these are defined in captivate and used in analysis
numberOfRightAnswers = 0;
numberOfQuestions = 0;
baseScore = 0;
baseMaxScore = 0;
bonusScore = 0;
bonusMaxScore = 0; // the right answer button is selected, signal this internal button
var theRightAnswers = {
"Question_T_1" : "Answer_1",
"Question_F_2" : "Answer_2",
"Question_T_3" : "Answer_3",
"Question_F_4" : "Answer_4",
"Question_T_5" : "Answer_5"
}//check each of the right answer button for state, if selected, signal to captivate
for (rightAnswerButton in theRightAnswers) {numberOfQuestions = numberOfQuestions +1;
rightAnswerSenderButton = theRightAnswers[rightAnswerButton];// get quiz value for this answer - this is obscure but works
answerObjectID = cp.D[rightAnswerSenderButton].qnq;
answerValue = cp.D[rightAnswerSenderButton + "q" + answerObjectID].w;//add to max base score
baseMaxScore = baseMaxScore + answerValue;theState = cp.getCurrentStateNameForSlideItem(rightAnswerButton);
if (theState == "selected") {
// undocumented function for signalling to a quiz button
cp.SubmitInteractions(rightAnswerSenderButton, cp.QuestionStatusEnum.CORRECT, 0)
numberOfRightAnswers = numberOfRightAnswers +1;
baseScore = baseScore + answerValue;
} }// add bonuses
rightAnswerSenderButton = "Bonus_25"
answerObjectID = cp.D[rightAnswerSenderButton].qnq;
answerValue = cp.D[rightAnswerSenderButton + "q" + answerObjectID].w;
bonusMaxScore = bonusMaxScore + answerValue;if (numberOfRightAnswers >= 4) {
cp.SubmitInteractions(rightAnswerSenderButton,
cp.QuestionStatusEnum.CORRECT, 0);
bonusScore = bonusScore + answerValue;
}rightAnswerSenderButton = "Bonus_50"
answerObjectID = cp.D[rightAnswerSenderButton].qnq;
answerValue = cp.D[rightAnswerSenderButton + "q" + answerObjectID].w;
bonusMaxScore = bonusMaxScore + answerValue;if (numberOfRightAnswers == 5) {
cpCmndNextSlide = 1; } quizSubmit();
cp.SubmitInteractions(rightAnswerSenderButton,
cp.QuestionStatusEnum.CORRECT, 0);
bonusScore = bonusScore + answerValue;
}
also, uncheck the box "Continue Playing the Project" as we will control the player.
The way this works is that first, we define which of the true/false buttons needs to be selected to indicate a correct answer. We then loop through each of these buttons to see if it was actually selected. The magic is in the function "cp.SubmitInteractions" which enables us to essentially click the answer button in javascript, indicating a correct response. Note that neither this or the function "cp.getCurrentStatementForSlideItem" are documented.
For the Bonus points, we simply check how many correct answers were made and submit the bonus point check boxes to be scored.
Along the way, this routine also accumulates the total number of questions, total score values and other variables for reporting.
Timing
In general, for question slides, we eliminate as much of Captivate's built in timing control as possible. All shape timings are set to "Display for rest of slide" and start at time 0 (zero). The Submit button is set to pause at 0.1 second. That's it.
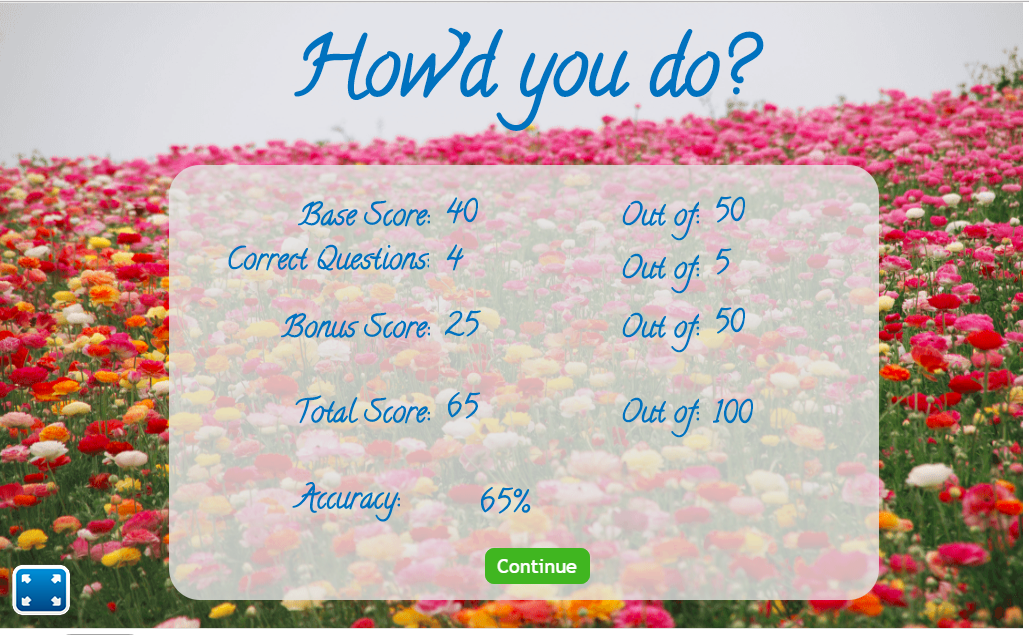
Result Slide
Here is an example of a fully custom result slide. We hide the Captivate default answer slide and build our own using our own accumulator variables. LMS reporting still works, as the Captivate internal quiz variables are also being updated in JavaScript
Conculsion — Why is this example important?
There is a lot of flexibility on quiz formats once some basic aspects of how scoring works in Captivate are clarified. The strategy outlined here creates tremendous flexibility in developing custom user interactions, with the actual scoring and reporting performed by a simple JavaScript routine associated with a submit button.
In particular:
- The scoring is completely general
- No advanced actions
- Regular slide, not quiz slide
- Custom interactions can span multiple slides/views
Other measures can be made along the way:
- How many times has the user changed their score?
- How long did it take before the user completed the quiz?
- Scoring doesn't happen for any of the questions until the interaction is complete
There are numerous great tutorials on line that address all kinds of aspects of quizzes. This approach is one of many alternatives.
How To Use Captivate App Instructional Design
Source: https://medium.com/@hdecisions/building-a-fully-custom-quiz-in-adobe-captivate-using-javascript-4a12a33a57b4
Posted by: sublettandere.blogspot.com
0 Response to "How To Use Captivate App Instructional Design"
Post a Comment